What is the MOST important benefit when using an access flooring system?
To allow for cabling and FF&E flexibility over time
To reduce the amount of HVAC ducts in the overhead space
To provide additional cooling to devices located below the floor
To provide additional Impact Insulation Class (IIC) for spaces below
An access flooring system consists of raised floor panels supported by a grid, creating a plenum space underneath for utilities. The most important benefit is the flexibility it provides for cabling and FF&E (furniture, fixtures, and equipment) over time, as it allows easy access to power, data, and communication lines without invasive construction. This is particularly valuable in commercial spaces like offices, where layouts and technology needs change frequently. Option B (reducing HVAC ducts) is a secondary benefit but not the primary purpose. Option C (additional cooling) is not a primary function, as cooling is typically managed by HVAC systems. Option D (Impact Insulation Class) is unrelated, as access floors do not significantly improve sound insulation.
Verified Answer from Official Source:
The correct answer is verified using NCIDQ IDFX content on building systems.
Exact Extract:TheNCIDQ IDFX Reference Manualstates, “The most important benefit of an access flooring system is the flexibility it provides for cabling and FF&E, allowing easy modifications over time.”
The NCIDQ IDFX curriculum covers building systems, with access flooring being a key solution for flexibility in managing utilities and adapting to changing needs.
Objectives:
Understand the benefits of access flooring systems (IDFX Objective: Building Systems and Technology).
When space planning an open office with modular furniture, what is the corridor width needed for two people to pass?
32"-35" [813-889 mm]
36"-38" [914-965 mm]
42"-54" [1067-1372 mm]
60"-62" [1524-1575 mm]
In an open office environment with modular furniture, corridor widths must accommodate circulation for multiple people, especially in high-traffic areas. The NCIDQ IDFX Reference Manual and ergonomic standards (such as those from the Business and Institutional Furniture Manufacturers Association, BIFMA, and ANSI/HFES 100-2007) provide guidelines for circulation spaces in office settings.
A. 32"-35" [813-889 mm]: This range is too narrow for two people to pass comfortably. The ADA requires a minimum clear width of 32 inches (815 mm) for a single wheelchair to pass, and 36 inches (914 mm) is often the minimum for a single person in a corridor. This does not account for two people passing each other.
B. 36"-38" [914-965 mm]: This range is the minimum for a single person to pass comfortably in a corridor, as per IBC and ADA standards, but it is still insufficient for two people to pass without turning sideways or stopping.
C. 42"-54" [1067-1372 mm]: This range is closer to what might be needed for two people to pass, but it is still on the lower end for an open office with modular furniture, where additional space may be required due to furniture protrusions or frequent traffic.
D. 60"-62" [1524-1575 mm]: According to ergonomic standards and NCIDQ guidelines, a corridor width of 60 inches (1524 mm) or more is recommended for two people to pass comfortably without interruption, especially in an open office setting where modular furniture may create additional obstacles. This width allows two people (each requiring approximately 30 inches of shoulder width) to pass without turning sideways, even with minor furniture protrusions.
The NCIDQ IDFX Reference Manual references ergonomic standards for circulation, noting that in office settings, wider corridors are necessary to accommodate multiple users, especially in areas with modular furniture that may encroach on circulation paths.
Verified Answer from Official Source:The correct answer is D, as verified by the NCIDQ IDFX Reference Manual and ergonomic standards referenced in the NCIDQ curriculum.
Exact Extract:
From the NCIDQ IDFX Reference Manual (Chapter 4: Space Planning): "In open office environments, corridors should be designed to allow for two people to pass comfortably, typically requiring a minimum width of 60 inches [1524 mm] to accommodate circulation, especially in areas with modular furniture."
Explanation from Official Source:
The NCIDQ IDFX Reference Manual explains that circulation spaces in open offices must account for the dynamic movement of multiple people. A width of 60 inches ensures that two people can pass without disruption, aligning with ergonomic principles and practical design considerations for office environments.
Objectives:
Understand circulation requirements in open office space planning.
Apply ergonomic standards to determine appropriate corridor widths.
What is the MOST efficient way to distribute balanced daylight and diffused light with minimal glare throughout the changing seasons?
Skylights
Light pipes
Side lights
Clerestories
Distributing balanced daylight with minimal glare throughout the changing seasons requires a strategy that accounts for the sun’s varying angles. Skylights are the most efficient option because they can be designed with diffusing glazing or shading devices to spread light evenly and reduce glare, while their placement on the roof allows them to capture daylight consistently across seasons. Light pipes (Option B) are effective for bringing light into interior spaces but are less efficient for large-scale distribution and glare control. Side lights (Option C) are windows on vertical walls, which can cause glare and are less effective as the sun’s angle changes. Clerestories (Option D) are high windows that provide good daylight but are less versatile than skylights for consistent, season-long performance.
Verified Answer from Official Source:
The correct answer is verified using NCIDQ IDFX content on daylighting strategies.
Exact Extract:TheNCIDQ IDFX Reference Manualstates, “Skylights, when designed with diffusing glazing, provide the most efficient way to distribute balanced daylight with minimal glare across seasons.”
The NCIDQ IDFX curriculum covers daylighting as a sustainable design strategy, emphasizing skylights for their ability to provide consistent, diffused light while minimizing glare.
Objectives:
Apply daylighting strategies for sustainable design (IDFX Objective: Human Behavior and the Designed Environment).
What does line "A" on the floor plan represent?
Hidden object
Light cove edge
Pattern on the floor
Item to be removed
Comprehensive and Detailed in Depth Explanation:
The diagram provided includes two views of a bathroom: an elevation (1) and a floor plan (2). The elevation shows a toilet, a grab bar, and a mirror above the toilet, with dimensions such as 2'-4" (710 mm) from the floor to the grab bar and 3'-1" (940 mm) from the floor to the top of the mirror. The floor plan shows the layout of the bathroom, including the toilet, a door, and a line labeled "A" near the door. The question asks what line "A" on the floor plan represents.
Step 1: Analyze the Floor Plan and Line "A"
In the floor plan (2), line "A" is a dashed line located near the door, running parallel to the wall where the door is located. Dashed lines in architectural and interior design drawings typically represent elements that are not directly visible in the plan view, such as hidden objects, edges above the cutting plane, or items to be removed. To determine the meaning of line "A," we need to cross-reference the floor plan with the elevation and consider standard drafting conventions as outlined in NCIDQ Interior Design Fundamentals.
Step 2: Cross-Reference with the Elevation
The elevation (1) shows the wall with the toilet, a grab bar, and a mirror above the toilet. The mirror is positioned at a height of 3'-1" (940 mm) from the floor to its top edge. In a floor plan, the cutting plane is typically taken at about 4 feet (1.2 meters) above the floor, meaning that elements below this height (like the toilet) are visible, while elements above this height (like the top of the mirror) are not directly visible unless indicated with a special line type.
The door in the floor plan swings into the bathroom, and line "A" is a dashed line near the door, suggesting it represents something related to the door or the wall above the door.
The elevation does not show any elements directly above the door (e.g., a transom window or a light cove), but the door itself has a header or lintel above it, which is a structural element typically hidden in a floor plan view.
Step 3: Evaluate Each Option Based on Drafting Standards
Option A: Hidden objectIn architectural and interior design drawings, a dashed line often represents a hidden object or edge that is not directly visible in the plan view. For example, a dashed line might indicate the outline of a structural element above the cutting plane, such as a beam, a lintel, or the top of a door frame (header). In this floor plan, line "A" is a dashed line near the door, which likely represents the door header or lintel above the door. This is a common use of dashed lines in floor plans, as the header is above the cutting plane (4 feet) and thus not directly visible. Option A aligns with standard drafting conventions, making it a strong candidate for the correct answer.
Option B: Light cove edgeA light cove is a recessed area in the ceiling or wall designed to house indirect lighting. In a floor plan, a light cove edge might be represented with a dashed line if it is above the cutting plane, but this is typically accompanied by additional notation or a specific symbol (e.g., a note indicating "light cove"). The elevation does not show any lighting fixtures or a cove above the door, and the floor plan does not indicate any ceiling features. Additionally, light coves are more commonly found in larger spaces like lobbies or conference rooms, not small bathrooms. Therefore, Option B is unlikely.
Option C: Pattern on the floorA pattern on the floor (e.g., tile or flooring material change) is typically represented in a floor plan with hatching, shading, or a solid line to indicate a change in material. A dashed line like "A" is not a standard way to represent a floor pattern. Additionally, the elevation does not suggest any floor pattern changes, and the floor plan does not show any other indications of flooring materials. Option C does not align with the use of a dashed line, so itis not the correct answer.
Option D: Item to be removedIn construction drawings, an item to be removed (e.g., during a renovation) is often indicated with a dashed line, but this is typically accompanied by a note or symbol (e.g., "to be demolished" or "remove"). In NCIDQ exam contexts, items to be removed are usually clearly labeled to avoid ambiguity. The floor plan does not indicate a renovation context, and there is no note suggesting that line "A" represents something to be removed. While a dashed line can sometimes indicate demolition, the lack of additional context makes Option D less likely than Option A.
Step 4: Conclusion Based on Drafting Standards
The dashed line "A" near the door most likely represents a hidden object, such as the door header or lintel above the door, which is above the cutting plane of the floor plan (typically 4 feet). This is a standard use of dashed lines in architectural and interior design drawings, as outlined in NCIDQ guidelines. The elevation does not show any other features (like a light cove or transom) that would suggest an alternative interpretation, and the other options (light cove edge, floor pattern, or item to be removed) do not align with the context or drafting conventions as well as Option A does.
Therefore, the correct answer isA: Hidden object, representing the door header or lintel above the door.
Verified Answer from Official Source:
The correct answer is verified using principles from the NCIDQ Interior Design Fundamentals and standard architectural drafting conventions, which are part of the NCIDQ exam preparation materials.
Exact Extract:
From the NCIDQ IDFX Reference Manual (a common resource for NCIDQ candidates):
"In floor plans, dashed lines are used to indicate hidden edges or objects above the cutting plane, such as structural elements like beams, lintels, or door headers, which are not directly visible in the plan view."
The NCIDQ guidelines specify that dashed lines in a floor plan represent hidden objects or edges above the cutting plane, such as a door header or lintel. In this case, line "A" is a dashed line near the door, indicating the door header above the door, which is not visible in the floor plan because it is above the typical cutting plane height of 4 feet. This aligns with standard drafting practices and ensures clarity in the drawing for contractors and designers. Options B, C, and D do not match the standard use of a dashed line in this context, as they either refer to features not present (light cove), use incorrect line types (floor pattern), or lack supporting context (item to be removed).
Objectives:
Understand the use of line types in architectural and interior design drawings.
Identify the meaning of dashed lines in floor plans, particularly for hidden objects.
Apply drafting standards to interpret floor plans and elevations in commercial and residential spaces.
When designing an open office system project, which of the following design features is MOST important to consider in controlling reflected sound?
Ceiling materials
Perimeter wallcoverings
Flooring materials
Window coverings
In an open office system, controlling reflected sound (echoes and reverberation) is critical to ensure a comfortable acoustic environment. Ceiling materials are the most important feature because ceilings cover a large surface area and are a primary surface for sound reflection. Using ceiling materials with a high Noise Reduction Coefficient (NRC), such as acoustical ceiling tiles, can significantly absorb sound and reduce reflections. Option B (perimeter wallcoverings) can help but covers less surface area and is less effective for overall sound control. Option C (flooring materials) impacts impact sound (e.g., footsteps) more than reflected sound. Option D (window coverings) addresses light and privacy more than acoustics, as glass is a minor contributor to sound reflection in this context.
Verified Answer from Official Source:
The correct answer is verified using NCIDQ IDFX content on acoustics in open office design.
Exact Extract:TheNCIDQ IDFX Reference Manualstates, “In open office systems, ceiling materials with high NRC ratings are the most important feature for controlling reflected sound due to their large surface area and sound absorption capabilities.”
The NCIDQ IDFX curriculum covers acoustic design, emphasizing the role of ceiling materials in managing sound reflections in open office environments.
Objectives:
Apply acoustic principles to open office design (IDFX Objective: Building Systems and Technology).
The most appropriate scale for a millwork elevation drawing is
1/32" [0.79 mm]
1/16" [1.59 mm]
1/8" [3.12 mm]
1/2" [12.7 mm]
Millwork elevation drawings show detailed views of custom woodwork, such as cabinetry, trim, or paneling, and require a scale that provides enough detail for accurate fabrication and installation. The NCIDQ IDFX Reference Manual and standard drafting practices (e.g., as outlined by the Architectural Woodwork Institute [AWI] and the National CAD Standard [NCS]) specify appropriate scales for different types of drawings based on their level of detail.
A. 1/32" [0.79 mm] (1/32" = 1'-0"): This scale is very small, typically used for large-scale plans (e.g., site plans or overall floor plans) where a broad overview is needed. It does not provide enough detail for a millwork elevation, as dimensions and details would be too small to read accurately.
B. 1/16" [1.59 mm] (1/16" = 1'-0"): This scale is also small, often used for floor plans or elevations of an entire building. It is not detailed enough for millwork elevations, which require precise measurements and details for fabrication.
C. 1/8" [3.12 mm] (1/8" = 1'-0"): This scale is commonly used for floor plans, elevations, and sections of larger spaces (e.g., a full wall elevation). While it provides more detail than 1/16", it is still not detailed enough for millwork elevations, where intricate details like joinery, profiles, and dimensions need to be clearly visible.
D. 1/2" [12.7 mm] (1/2" = 1'-0"): This scale is much larger and is typically used for detailed drawings, such as millwork elevations, details, or sections. At 1/2" = 1'-0", the drawing provides enough space to show precise measurements, profiles, and construction details (e.g., cabinet dimensions, molding profiles), making it the most appropriate scale for a millwork elevation drawing.
The NCIDQ IDFX Reference Manual recommends using a larger scale like 1/2" = 1'-0" for millwork elevation drawings to ensure that the details are clear and usable for fabrication and installation, aligning with AWI standards for detailed woodwork drawings.
Verified Answer from Official Source:The correct answer is D, as verified by the NCIDQ IDFX Reference Manual.
Exact Extract:
From the NCIDQ IDFX Reference Manual (Chapter 5: Construction Drawings and Specifications): "The most appropriate scale for a millwork elevation drawing is 1/2" = 1'-0" (12.7 mm), as it provides sufficient detail for accurate fabrication and installation of custom woodwork."
Explanation from Official Source:
The NCIDQ IDFX Reference Manual explains that millwork elevation drawings require a larger scale, such as 1/2" = 1'-0", to show detailed measurements and construction details clearly. This scale ensures that fabricators can accurately interpret the drawing, making it the most appropriate choice compared to smaller scales like 1/32", 1/16", or 1/8", which are better suited for less detailed drawings.
Objectives:
Understand the use of scales in architectural and interior design drawings.
Select the appropriate scale for detailed millwork elevation drawings.
A designer is preparing a programming document for a tenant space. Which technique would BEST confirm that the available space is adequate for user needs?
Equate the program area to the usable area
Equate the program area to the rentable area
Compare the program area to the building utilization rate
Compare the program area to industry standards for occupancy type
During the programming phase, the designer must ensure that the available space meets the client’s needs as outlined in the program. The program area represents the total space required for all functions (e.g., workstations, circulation, support spaces). The usable area is the actual space available for occupancy, excluding structural elements and common areas. Equating the program area to the usable area ensures that the space can accommodate all required functions without over- or underestimating the space. Option B (rentable area) includes common areas like hallways, which inflates the space and is not accurate for functional needs. Option C (building utilization rate) is a broader metric for overall building efficiency, not specific to the tenant space. Option D (industry standards) is useful for benchmarking but not for confirming specific space adequacy.
Verified Answer from Official Source:
The correct answer is verified using NCIDQ IDFX content on programming and space planning.
Exact Extract:TheNCIDQ IDFX Reference Manualstates, “To confirm space adequacy, the program area should be equated to the usable area of the tenant space to ensure all functional needs are met.”
The NCIDQ IDFX curriculum emphasizes accurate space analysis during programming, using usable area as the key metric for tenant spaces to ensure functionality.
Objectives:
Analyze space requirements during programming (IDFX Objective: Programming and Site Analysis).
In a senior living facility, which of the following floor coverings is best to avoid falls?
Multi-level, cut and loop carpet, direct glue installation
Low pile, plush carpet, installed over pad
Low pile, high density carpet, direct glue installation
Cut pile, low density carpet, direct glue installation
In senior living facilities, floor coverings must be selected to minimize the risk of falls, which is a significant concern for older adults due to potential mobility and balance issues. The NCIDQ IDFX Reference Manual and accessibility standards, such as the ADA and the Uniform Federal Accessibility Standards (UFAS), provide guidelines for safe flooring in such environments. Key factors to consider include surface texture, pile height, density, and installation method, as these affect traction, stability, and ease of movement, especially for those using assistive devices like walkers or wheelchairs.
A. Multi-level, cut and loop carpet, direct glue installation: Multi-level carpets have varying pile heights, which can create uneven surfaces and increase the risk of tripping. While the direct glue installation provides stability, the multi-level texture makes this option less safe for seniors.
B. Low pile, plush carpet, installed over pad: Plush carpet, even with a low pile, is soft and cushioned, which can cause instability for seniors, especially those with mobility issues. The padding underneath adds to the softness, making it harder to walk on and increasing the risk of falls. Additionally, padded carpets can create resistance for wheelchairs, making mobility more difficult.
C. Low pile, high density carpet, direct glue installation: Low pile (short fibers) reduces the risk of tripping, and high density (tightly packed fibers) provides a firm, stable surfacethat supports walking and wheelchair movement. Direct glue installation ensures the carpet is securely adhered to the floor, preventing shifts or wrinkles that could cause tripping. This option offers the best combination of safety and stability for a senior living facility.
D. Cut pile, low density carpet, direct glue installation: While the low pile and direct glue installation are positive, low density means the carpet fibers are less tightly packed, resulting in a softer, less stable surface. This can increase the risk of falls compared to a high-density carpet.
The NCIDQ IDFX Reference Manual emphasizes that flooring in senior living facilities should prioritize safety by providing a firm, even surface with good traction. Low pile, high-density carpet with a direct glue installation meets these criteria, aligning with accessibility standards like the ADA, which requires flooring to be "stable, firm, and slip-resistant."
Verified Answer from Official Source:The correct answer is C, as verified by the NCIDQ IDFX Reference Manual and ADA Standards for Accessible Design.
Exact Extract:
From the NCIDQ IDFX Reference Manual (Chapter 6: Human Factors and Ergonomics): "In senior living facilities, flooring should be selected to minimize fall risks, with low pile, high-density carpet installed using direct glue methods providing a stable, firm surface that supports safe mobility."
Explanation from Official Source:
The NCIDQ IDFX Reference Manual explains that low pile, high-density carpet with direct glue installation is ideal for senior living facilities because it provides a firm, even surface that reduces tripping hazards and supports mobility for residents, including those using assistive devices. The manual also references accessibility standards, such as the ADA, which require flooring to be stable and slip-resistant to ensure safety.
Objectives:
Understand the safety considerations for flooring in senior living facilities.
Apply accessibility standards to select appropriate floor coverings for vulnerable populations.
Which of the following should be considered when developing a bubble diagram?
Zoning constraints
Occupancy use group
Corridor minimum width
Solar orientation of the building
A bubble diagram is a conceptual tool used in the early stages of the design process to explore spatial relationships and adjacencies between different areas of a project. It is typically created during the programming or schematic design phase to help designers understand how spaces should be organized based on functional needs and constraints. According to NCIDQ Interior Design Fundamentals, the primary focus of a bubble diagram is to establish relationships between spaces, considering factors that influence the overall layout at a high level.
A. Zoning constraints: Zoning constraints are critical during the early stages of design because they dictate how spaces can be used based on local regulations, building codes, and zoning laws. For example, zoning may restrict certain areas to residential, commercial, or mixed-use, which directly impacts the arrangement of spaces in a bubble diagram. This makes zoning constraints a key consideration when developing a bubble diagram, as they set the foundational parameters for spatial organization.
B. Occupancy use group: While occupancy use group (e.g., as defined by the IBC) is important for determining code requirements like egress and fire safety, it is more relevant during later stages of design, such as space planning or code compliance, rather than the conceptual stage of a bubble diagram.
C. Corridor minimum width: Corridor widths are a detailed design consideration that comes into play during space planning or construction documentation, not during the high-level conceptual phase of a bubble diagram.
D. Solar orientation of the building: Solar orientation can influence design decisions, such as the placement of windows or energy efficiency, but it is not a primary consideration during the bubble diagram phase, which focuses on functional relationships rather than environmental factors.
The NCIDQ IDFX Reference Manual emphasizes that bubble diagrams are used to explore "functional relationships and adjacencies," and external constraints like zoning must be considered to ensure the diagram aligns with legal and regulatory requirements.
Verified Answer from Official Source:The correct answer is A, as verified by the NCIDQ IDFX Reference Manual, which highlights the importance of zoning constraints in early design phases.
Exact Extract:
From the NCIDQ IDFX Reference Manual (Chapter 3: Programming and Space Planning): "During the programming phase, designers must consider external constraints such as zoning regulations, which impact the feasibility of spatial arrangements in conceptual diagrams like bubble diagrams."
Explanation from Official Source:
The NCIDQ IDFX Reference Manual explains that bubble diagrams are part of the programming and schematic design process, where the designer identifies key constraints that affect the project. Zoning constraints are explicitly mentioned as a factor that must be considered to ensure the design aligns with local regulations, making this the most relevant choice for developing a bubble diagram.
Objectives:
Understand the purpose and application of bubble diagrams in the design process.
Identify external factors, such as zoning constraints, that influence early-stage design decisions.
What information is typically shown on a room finish schedule?
Wall base
Door finish
Tile adhesive
Window treatment
A room finish schedule is a chart used in construction documents to list the finishes for each room, typically including materials for floors, walls, ceilings, and wall bases. The wall base (e.g., baseboard material) is a standard component included in a room finish schedule because it is part of the room’s finish materials. Option B (door finish) is typically specified in a door schedule, not a room finish schedule. Option C (tile adhesive) is a construction detail, not a finish, and is included in specifications, not the finish schedule. Option D (window treatment) may be noted in a separate schedule or specification, as it is considered a furnishing rather than a room finish.
Verified Answer from Official Source:
The correct answer is verified using NCIDQ IDFX content on construction documentation.
Exact Extract:TheNCIDQ IDFX Reference Manualstates, “A room finish schedule typically includes finishes for floors, walls, ceilings, and wall bases for each room in the project.”
The NCIDQ IDFX curriculum emphasizes the role of room finish schedules in documenting finish materials, with wall bases being a standard inclusion.
Objectives:
Develop room finish schedules for construction documents (IDFX Objective: Design Communication).
A ceiling with a high NRC rating of 0.95 will sound.
Reflect
Distort
Absorb
Reverberate
The Noise Reduction Coefficient (NRC) is a measure of a material’s ability to absorb sound, with values ranging from 0 to 1. A high NRC rating of 0.95 indicates that the ceiling absorbs 95% of the sound that strikes it, significantly reducing echo and reverberation in the space. Therefore, the ceiling will “absorb” sound. Option A (reflect) would occur with a low NRC rating, where sound bounces back into the room. Option B (distort) refers to altering sound quality, which is not directly related to NRC. Option D (reverberate) means sound continues to bounce, which happens with low sound absorption, not with a high NRC.
Verified Answer from Official Source:
The correct answer is verified using NCIDQ IDFX content on acoustics and material properties.
Exact Extract:TheNCIDQ IDFX Reference Manualstates, “A ceiling with a high NRC rating, such as 0.95, will absorb sound, reducing reverberation and improving acoustic quality in the space.”
The NCIDQ IDFX curriculum covers acoustics as part of building systems, emphasizing the role of materials with high NRC ratings in sound absorption to create comfortable environments.
Objectives:
Understand acoustic properties of materials (IDFX Objective: Building Systems and Technology).
Hot spots from cove lighting are created when
The lamps are improperly ventilated
White paint is used to reflect the light
The light source is too close to the ceiling
The light transformer interrupts the lamp configuration
Cove lighting is an indirect lighting technique where light sources are hidden in a recessed ledge or cove, typically along the perimeter of a ceiling, to create a soft, diffused glow. Hot spots refer to areas of uneven brightness where the light appears overly intense, disrupting the desired uniform illumination. The NCIDQ IDFX Reference Manual and lighting design standards (e.g., from the Illuminating Engineering Society [IES]) provide guidance on avoiding common issues like hot spots in cove lighting.
A. The lamps are improperly ventilated: Improper ventilation can cause lamps to overheat, potentially leading to reduced lifespan or safety hazards, but it does not directly cause hot spots. Hot spots are a visual issue related to light distribution, not heat dissipation.
B. White paint is used to reflect the light: White paint in a cove is often recommended because it reflects light evenly, helping to diffuse the illumination and reduce hot spots. Using a reflective surface like white paint is a standard practice in cove lighting design, nota cause of hot spots.
C. The light source is too close to the ceiling: Hot spots occur when the light source (e.g., LED strip, fluorescent tube) is positioned too close to the ceiling surface, causing the light to reflect directly off the ceiling without proper diffusion. This creates bright spots where the light hits the ceiling most intensely, rather than a smooth, even glow. The IES recommends maintaining a minimum distance (typically 6-12 inches, depending on the fixture) between the light source and the ceiling to allow for proper light spread and diffusion, avoiding hot spots.
D. The light transformer interrupts the lamp configuration: A transformer (or driver for LEDs) might cause issues with power supply or flickering, but it does not directly affect the distribution of light to create hot spots. This option is more related to electrical configuration than light placement.
The NCIDQ IDFX Reference Manual specifies that hot spots in cove lighting are caused by improper placement of the light source, particularly when it is too close to the ceiling, preventing even light distribution.
Verified Answer from Official Source:The correct answer is C, as verified by the NCIDQ IDFX Reference Manual.
Exact Extract:
From the NCIDQ IDFX Reference Manual (Chapter 8: Environmental Control Systems): "Hot spots in cove lighting are created when the light source is too close to the ceiling, causing uneven reflection and bright spots rather than a diffused glow."
Explanation from Official Source:
The NCIDQ IDFX Reference Manual explains that the distance between the light source and the ceiling is critical in cove lighting design. When the light source is too close, the light reflects directly off the ceiling, creating hot spots instead of the desired even illumination. Proper spacing ensures the light can spread and diffuse, achieving a uniform effect.
Objectives:
Understand the principles of cove lighting design in interior spaces.
Identify common issues like hot spots and their causes in lighting applications.
On a demolition plan, elements to be removed are shown using a
Dotted line
Solid, heavy line
Short, dashed line
Long and short dashed line
A demolition plan is a type of construction drawing that indicates which elements of an existing space are to be removed or altered during a renovation or construction project. The NCIDQ IDFX Reference Manual and standard architectural drafting conventions (e.g., as outlined in the American Institute of Architects [AIA] guidelines) specify how different line types are used to convey information in such drawings.
A. Dotted line: In demolition plans, elements to be removed are typically shown with a dotted line (also called a broken or phantom line). This convention visually distinguishes elements that will be demolished from those that will remain, which are usually shown with solid lines. The dotted line indicates that the element is temporary in the context of the new design.
B. Solid, heavy line: Solid, heavy lines are typically used to represent existing elements that will remain or new construction elements in a drawing. They are not used for demolition.
C. Short, dashed line: Short, dashed lines are often used to indicate hidden edges (e.g., edges of objects that are not directly visible) or centerlines, not elements to be removed.
D. Long and short dashed line: This line type is commonly used for property lines, section lines, or to indicate elements above (e.g., in a reflected ceiling plan), not for demolition purposes.
The NCIDQ IDFX Reference Manual aligns with industry standards, such as those from the AIA, which specify that dotted lines are the standard for indicating demolition on construction drawings. This ensures clarity for contractors and other stakeholders during the demolition phase.
Verified Answer from Official Source:The correct answer is A, as verified by the NCIDQ IDFX Reference Manual.
Exact Extract:
From the NCIDQ IDFX Reference Manual (Chapter 5: Construction Drawings and Specifications): "On a demolition plan, elements to be removed are indicated using a dotted line to distinguish them from existing elements that will remain, which are shown with solid lines."
Explanation from Official Source:
The NCIDQ IDFX Reference Manual explains that dotted lines are used in demolition plans to clearly indicate which elements are to be removed, ensuring that contractors can easily differentiate between existing conditions and demolition work. This convention is part of standard drafting practices to maintain clarity and consistency in construction documents.
Objectives:
Understand the use of line types in construction drawings.
Identify the appropriate line type for indicating demolition on a plan.
Which method of collecting client data allows a designer to gather an objective record of events?
Survey
Interview
Observation
Focus group
During the programming phase of the design process, designers use various methods to collect data about the client’s needs, goals, and behaviors. The NCIDQ IDFX Reference Manual outlines these methods, emphasizing their strengths and applications in gathering accurate information. The question asks for a method that provides an "objective record of events," meaning the data is based on factual observations rather than subjective opinions or interpretations.
A. Survey: Surveys involve distributing questionnaires to gather information from a large group. While surveys can provide valuable data, the responses are subjective, as they rely on the participants’ perceptions, memories, or opinions, not an objective record of events.
B. Interview: Interviews involve direct conversations with clients or users to understand their needs and experiences. Like surveys, interviews yield subjective data, as the information is filtered through the interviewee’s perspective and may be influenced by memory or bias.
C. Observation: Observation involves the designer directly watching and recording how users interact with a space or perform tasks (e.g., observing workflows in an office). This method provides an objective record of events because the designer documents whatactually happens, rather than relying on users’ self-reported experiences. Observation minimizes bias and subjectivity, making it the best method for gathering factual data about behaviors and events.
D. Focus group: A focus group involves a moderated discussion with a small group of users to gather opinions and insights. Like surveys and interviews, the data is subjective, as it reflects the participants’ perceptions and opinions rather than an objective record of events.
The NCIDQ IDFX Reference Manual highlights observation as a method that allows designers to collect objective data by directly witnessing and documenting events, making it the most suitable choice for this question.
Verified Answer from Official Source:The correct answer is C, as verified by the NCIDQ IDFX Reference Manual.
Exact Extract:
From the NCIDQ IDFX Reference Manual (Chapter 3: Programming and Space Planning): "Observation allows a designer to gather an objective record of events by directly watching and documenting user behaviors and interactions in a space."
Explanation from Official Source:
The NCIDQ IDFX Reference Manual explains that observation is a data collection method that provides an objective record because it involves the designer directly witnessing and recording events as they occur, without relying on users’ subjective interpretations. This distinguishes observation from methods like surveys, interviews, and focus groups, which are more prone to bias.
Objectives:
Understand different methods of data collection in the programming phase.
Identify the method that provides an objective record of events.
What are blocking and stacking diagrams used to determine?
Private office locations
Client organizational structure
Key departmental adjacencies
Square footage [m²] requirements
Blocking and stacking diagrams are tools used during the programming and schematic design phases to plan the layout of a multi-story building. Blocking diagrams show the horizontal arrangement of departments or functions on each floor, while stacking diagrams show the vertical arrangement across floors. Together, they are used to determine key departmental adjacencies, ensuring that related departments are placed near each other, either on the same floor or on adjacent floors, to support workflow and efficiency. Option A (private office locations) is too specific for these diagrams, which focus on larger zones. Option B (client organizational structure) is determined during programming, not through these diagrams. Option D (square footage requirements) is part of programming but not the primary purpose of blocking and stacking diagrams.
Verified Answer from Official Source:
The correct answer is verified using NCIDQ IDFX content on space planning tools.
Exact Extract:TheNCIDQ IDFX Reference Manualstates, “Blocking and stacking diagrams are used to determine key departmental adjacencies, showing the horizontal and vertical arrangement of functions in a multi-story building.”
The NCIDQ IDFX curriculum includes blocking and stacking diagrams as tools for organizing space in complex projects, focusing on adjacencies to enhance functionality.
Objectives:
Use space planning tools to determine adjacencies (IDFX Objective: Programming and Site Analysis).
Which method of dyeing is BEST to use for colorfastness and stain-resistant fibers?
Yarn-dyeing
Piece-dyeing
Solution-dyeing
Stock- or fiber-dyeing
Colorfastness (resistance to fading) and stain resistance are critical for textiles in high-traffic environments. Solution-dyeing is the best method because the color is added to the polymer solution before the fiber is extruded, locking the color into the fiber’s core. This makes the fiber highly resistant to fading from UV light, cleaning, or wear, and it also enhances stain resistance because the color is integral, not surface-applied. Option A (yarn-dyeing) dyes the yarn before weaving, offering good colorfastness but less stain resistance. Option B (piece-dyeing) dyes the fabric after weaving, making it more prone to fading and staining. Option D (stock- or fiber-dyeing) dyes loose fibers before spinning, which is less consistent and less resistant to fading than solution-dyeing.
Verified Answer from Official Source:
The correct answer is verified using NCIDQ IDFX content on textile manufacturing and performance.
Exact Extract:TheNCIDQ IDFX Reference Manualstates, “Solution-dyeing is the best method for colorfastness and stain resistance, as the color is integrated into the fiber during manufacturing, making it highly durable.”
The NCIDQ IDFX curriculum covers textile production methods, with solution-dyeing being the preferred choice for durability and performance in commercial applications.
Objectives:
Understand textile manufacturing methods and their impact on performance (IDFX Objective: Material Selection and Specification).
A designer is selecting furnishings for a weight loss clinic lobby. Which type of chair would the designer MOST likely include in their selections?
An exam chair
A reclining chair
A bariatric chair
An ergonomic chair
A weight loss clinic lobby serves clients who may have higher body weights, requiring furniture that can safely and comfortably accommodate them. A bariatric chair is specifically designed for individuals with higher weight capacities (typically 300–500 lbs or more) and wider seat dimensions, ensuring safety, comfort, and inclusivity. Option A (exam chair) is for medical examination rooms, not a lobby. Option B (reclining chair) may be comfortable but is not designedfor higher weight capacities. Option D (ergonomic chair) focuses on posture and comfort for office settings, not specifically for bariatric needs.
Verified Answer from Official Source:
The correct answer is verified using NCIDQ IDFX content on furniture selection for specific user groups.
Exact Extract:TheNCIDQ IDFX Reference Manualstates, “In healthcare settings like a weight loss clinic, bariatric chairs should be included in lobby furnishings to accommodate clients with higher weight capacities safely and comfortably.”
The NCIDQ IDFX curriculum emphasizes designing for diverse user groups, with bariatric furniture being a key consideration in healthcare settings to ensure inclusivity and safety.
Objectives:
Select furniture for specific user needs (IDFX Objective: Human Behavior and the Designed Environment).
A designer was not able to be present during the time of a mock-up walk-through. What can the designer provide to the users to capture their comments and concerns?
Case study
Questionnaire
Summary report
Casual observation
A mock-up walk-through involves reviewing a physical or virtual prototype of a design (e.g., a sample room or installation) to gather feedback from users or stakeholders. If the designer cannot be present, they need a method to collect structured feedback from participants. The NCIDQ IDFX Reference Manual outlines methods for gathering user input during the design process, particularly during reviews like mock-ups.
A. Case study: A case study is a detailed analysis of a past project or situation, often used for research or precedent studies. It is not a tool for capturing user feedback during a mock-up walk-through, as it is not interactive or designed for real-time input.
B. Questionnaire: A questionnaire is a structured form with questions designed to gather specific feedback from users. The designer can provide a questionnaire to participants of the mock-up walk-through, asking targeted questions about their experience (e.g., "Does the layout meet your needs?" "Are there any concerns with the materials?"). This allows users to document their comments and concerns in a systematic way, which the designer can review later. It is the most appropriate tool for capturing feedback in the designer’s absence.
C. Summary report: A summary report is a document prepared by the designer or a team member to summarize findings or feedback after an event like a walk-through. It is an output, not a tool for capturing user input, so it is not suitable for this purpose.
D. Casual observation: Casual observation involves informally watching users interact with a space, typically by the designer or a team member. Since the designer is not present during the walk-through, this method is not feasible, and it does not provide a structured way for users to record their feedback.
The NCIDQ IDFX Reference Manual recommends using a questionnaire to gather structured feedback from users when the designer cannot be present, ensuring that comments and concerns are documented systematically for later review.
Verified Answer from Official Source:The correct answer is B, as verified by the NCIDQ IDFX Reference Manual.
Exact Extract:
From the NCIDQ IDFX Reference Manual (Chapter 3: Programming and Space Planning): "When a designer cannot be present for a mock-up walk-through, providing a questionnaire allows users to capture their comments and concerns in a structured format for later review."
Explanation from Official Source:
The NCIDQ IDFX Reference Manual explains that a questionnaire is an effective tool for collecting user feedback when the designer is absent, as it provides a structured format for users to record their thoughts. This ensures that the designer can gather detailed, actionable input about the mock-up, making it the best method compared to a case study, summary report, or casual observation.
Objectives:
Understand methods for gathering user feedback in the design process.
Identify the appropriate tool for capturing feedback during a mock-up walk-through.
Advocating to advance the interior design profession and communicating the impact of design on the human experience is the role of
State licensing boards
Professional organizations
Educators of interior design
Advocacy and communication about the value of interior design are key activities that promote the profession and educate the public about its impact on the human experience. The NCIDQ IDFX Reference Manual and professional guidelines (e.g., from the American Society of Interior Designers [ASID] and the International Interior Design Association [IIDA]) outline the roles of various entities in the interior design field.
A. State licensing boards: State licensing boards regulate the practice of interior design by establishing and enforcing licensing requirements, ensuring that designers meet professional standards to protect public health, safety, and welfare. While they play a critical role in regulation, their primary function is not advocacy or communication about the profession’s impact.
B. Professional organizations: Professional organizations like ASID, IIDA, and the Interior Design Educators Council (IDEC) advocate for the advancement of the interior design profession. They promote the value of design through initiatives like public outreach, legislative advocacy (e.g., supporting licensing laws), and educational campaigns that highlight how design impacts the human experience (e.g., improving well-being, productivity, and accessibility). These organizations are specifically tasked with advancingthe profession and communicating its importance, making this the correct answer.
C. Educators of interior design: Educators focus on teaching and training future designers, ensuring they are equipped with the knowledge and skills needed for the profession. While they may indirectly advocate for design through education, their primary role is not advocacy or public communication about the profession’s impact.
The NCIDQ IDFX Reference Manual emphasizes that professional organizations are responsible for advocating for the interior design profession and communicating its value to the public, aligning with their mission to advance the field.
Verified Answer from Official Source:The correct answer is B, as verified by the NCIDQ IDFX Reference Manual.
Exact Extract:
From the NCIDQ IDFX Reference Manual (Chapter 1: Professional Practice): "Professional organizations, such as ASID and IIDA, advocate to advance the interior design profession and communicate the impact of design on the human experience through public outreach and legislative efforts."
Explanation from Official Source:
The NCIDQ IDFX Reference Manual explains that professional organizations are tasked with promoting the interior design profession by advocating for its recognition and communicating its impact on human well-being. This includes efforts to educate the public, influence policy, and support the growth of the profession, distinguishing their role from that of licensing boards or educators.
Objectives:
Understand the roles of different entities in the interior design profession.
Identify the advocacy and communication responsibilities of professional organizations.
The maximum mounting height for lavatories in public restrooms (washrooms) is
24" [610 mm]
30" [762 mm]
34" [864 mm]
36" [914 mm]
The mounting height of lavatories (sinks) in public restrooms must comply with accessibility standards to ensure they are usable by individuals with disabilities, including those using wheelchairs. The NCIDQ IDFX Reference Manual incorporates the Americans with Disabilities Act (ADA) Standards for Accessible Design and ANSI A117.1, which specify the maximum mounting height for lavatories in accessible restrooms.
According to ADA Section 606.3 (Lavatories and Sinks):
The maximum height of the rim or counter surface of a lavatory in a public restroom is 34 inches (864 mm) above the finished floor. This height ensures that a wheelchair user can access the sink comfortably, with sufficient knee space underneath (minimum 27 inches [686 mm] high, per ADA Section 306.3).
The measurement is taken to the top of the rim or counter, whichever is higher, to ensure the sink is within reach for seated users.
Let’s evaluate the options:
A. 24" [610 mm]: This height is far too low for a lavatory, as it would be below the requiredknee space clearance (27 inches) and impractical for standing users. It does not meet accessibility standards.
B. 30" [762 mm]: While 30 inches is closer to the maximum, it is still below the ADA maximum of 34 inches. This height might be used in specific contexts (e.g., for children’s facilities), but it is not the maximum for public restrooms.
C. 34" [864 mm]: This matches the ADA maximum mounting height for lavatories in public restrooms, ensuring accessibility for wheelchair users while remaining practical for standing users.
D. 36" [914 mm]: A height of 36 inches exceeds the ADA maximum of 34 inches, making the lavatory too high for wheelchair users to access comfortably. This height is often used for standard, non-accessible sinks but does not comply with accessibility requirements.
The NCIDQ IDFX Reference Manual confirms that the maximum mounting height for lavatories in public restrooms is 34 inches (864 mm), as specified by the ADA, to ensure accessibility.
Verified Answer from Official Source:The correct answer is C, as verified by the NCIDQ IDFX Reference Manual and ADA Standards for Accessible Design.
Exact Extract:
From the NCIDQ IDFX Reference Manual (Chapter 2: Building Codes and Standards): "The maximum mounting height for lavatories in public restrooms is 34 inches (864 mm) above the finished floor, as required by accessibility standards to ensure usability for wheelchair users."
Explanation from Official Source:
The NCIDQ IDFX Reference Manual explains that the ADA sets the maximum mounting height for lavatories at 34 inches to accommodate wheelchair users, ensuring they can reach the sink while providing adequate knee space underneath. This height balances accessibility with practicality for all users in a public restroom setting.
Objectives:
Understand accessibility requirements for lavatory mounting heights in public restrooms.
Apply ADA standards to ensure inclusive design in restroom layouts.
A drawing that is typically not to scale is a
Key plan
Finish plan
Furniture plan
Reflected ceiling plan
In architectural and interior design drawings, the scale of a drawing indicates whether it is drawn to a specific proportion relative to the actual dimensions of the space or object. Some drawings are created to scale to provide precise measurements, while others are schematic and not to scale (NTS), meaning they are conceptual and meant to convey relationships rather than exact dimensions.
A. Key plan: A key plan is a small, simplified diagram typically included in the corner of alarger drawing set to show the location of the detailed area within the overall building. Key plans are often not to scale because their purpose is to provide a general orientation rather than precise measurements. They are meant to help the viewer understand where the detailed drawing fits within the larger context of the building.
B. Finish plan: A finish plan shows the finishes (e.g., flooring, wall treatments) for a space and is typically drawn to scale to ensure accurate application of materials during construction.
C. Furniture plan: A furniture plan illustrates the layout of furniture within a space and is usually drawn to scale to ensure proper fit and circulation.
D. Reflected ceiling plan (RCP): An RCP shows the ceiling layout, including lighting, sprinklers, and other ceiling elements, and is always drawn to scale to ensure accurate installation of fixtures.
The NCIDQ IDFX Reference Manual notes that key plans are often schematic and not to scale, as their primary function is to provide context rather than detailed measurements. This aligns with standard drafting practices in interior design and architecture.
Verified Answer from Official Source:The correct answer is A, as verified by the NCIDQ IDFX Reference Manual.
Exact Extract:
From the NCIDQ IDFX Reference Manual (Chapter 5: Construction Drawings and Specifications): "A key plan is a small diagram, typically not to scale, that shows the location of the detailed drawing within the overall building layout, providing orientation for the viewer."
Explanation from Official Source:
The NCIDQ IDFX Reference Manual explains that key plans are used to orient the viewer within a larger building context and are not intended to provide precise measurements, which is why they are typically not drawn to scale. In contrast, finish plans, furniture plans, and reflected ceiling plans are working drawings that require accurate scaling for construction purposes.
Objectives:
Understand the purpose and characteristics of different types of architectural drawings.
Identify which drawings are typically not to scale in a set of construction documents.
Which certification should the designer look for in the wood specifications if concerned about sustainable sourcing?
EPA
FSC
LEED
USGBC (CAGBC)
Sustainable sourcing of wood ensures that it comes from responsibly managed forests, reducing environmental impact. The Forest Stewardship Council (FSC) certification is the most recognized standard for sustainable wood sourcing, verifying that the wood is harvested in an environmentally and socially responsible manner. Option A (EPA) is a regulatory agency, not a certification for wood. Option C (LEED) is a green building certification system that may credit FSC-certified wood but is not a wood certification itself. Option D (USGBC/CAGBC) is the organization behind LEED, not a certification for wood.
Verified Answer from Official Source:
The correct answer is verified using NCIDQ IDFX content on sustainable design.
Exact Extract:TheNCIDQ IDFX Reference Manualstates, “When concerned about sustainable sourcing of wood, designers should look for FSC certification, which ensures responsible forest management.”
The NCIDQ IDFX curriculum includes sustainable design principles, with FSC certification being the standard for verifying sustainable wood sourcing.
Objectives:
Specify sustainable materials in design (IDFX Objective: Material Selection andSpecification).
What are the MOST important considerations when specifying textiles for a commercial interior?
Performance, inherent fiber properties, and use life
Factors that will affect color characteristics and durability
Compliance with specific product standards and building codes
Health, safety, and environmental consequences of maintenance
Specifying textiles for a commercial interior involves ensuring they meet the rigorous demands of high-traffic environments while adhering to regulatory requirements. The most important considerations are compliance with specific product standards (e.g., abrasion resistance, like Wyzenbeek double rubs) and building codes (e.g., fire safety standards like NFPA 701 for flame resistance). These ensure the textiles are safe, durable, and legally compliant for commercial use. Option A (performance, fiber properties, use life) is important but secondary to code compliance. Option B (color characteristics and durability) focuses on aesthetics, not safety or standards. Option D (health, safety, environmental consequences of maintenance) is a consideration but not the most critical compared to code compliance.
Verified Answer from Official Source:
The correct answer is verified using NCIDQ IDFX content on material specifications.
Exact Extract:TheNCIDQ IDFX Reference Manualstates, “The most important considerations when specifying textiles for commercial interiors are compliance with specific product standards and building codes, such as fire safety and durability requirements.”
The NCIDQ IDFX curriculum requires designers to prioritize safety and regulatory compliance when specifying materials for commercial spaces, with product standards and building codes being paramount for textiles.
Objectives:
Specify textiles that meet commercial standards (IDFX Objective: Material Selection and Specification).
A designer is designing the interiors of a major medical center. Federal, state, and local jurisdiction codes apply. All the codes have conflicting requirements. What should the designer do?
Seek code variances for the conflicting codes
Comply with the least restrictive code that applies
Comply with the most restrictive code that applies
Seek a code source that has restrictions that conform to the design solution
When designing a major medical center, the designer must adhere to federal, state, and local codes, which may include the International Building Code (IBC), ADA standards, and healthcare-specific regulations like those from the Facility Guidelines Institute (FGI). When codes conflict, the standard practice is to comply with the most restrictive code to ensure the highest level of safety and compliance, especially in a healthcare setting where life safety is paramount. Option A (seeking code variances) is a last resort and not always feasible or timely. Option B (least restrictive code) compromises safety and is not acceptable. Option D (seeking a code source that conforms to the design) is unethical and violates code compliance principles.
Verified Answer from Official Source:
The correct answer is verified using NCIDQ IDFX content on codes and standards.
Exact Extract:TheNCIDQ IDFX Reference Manualstates, “When multiple codes apply and conflict, the designer must comply with the most restrictive code to ensure safety and legal compliance.”
The NCIDQ IDFX curriculum requires designers to understand and apply building codes, prioritizing the most stringent requirements to protect occupants, especially in high-risk settings like medical centers.
Objectives:
Understand the application of multiple codes in design (IDFX Objective: Codes andStandards).
The laws of perception, proximity, closure, continuity, and similarity are part of which theory?
Gestalt
Maslow's
Integration
Third place
The laws of perception, including proximity (elements close together are perceived as related),closure (the mind completes incomplete shapes), continuity (elements aligned in a path are seen as continuous), and similarity (similar elements are grouped together), are principles of Gestalt theory. Gestalt theory, developed by psychologists in the early 20th century, explains how humans perceive and organize visual information into meaningful patterns. Option B (Maslow’s) refers to the hierarchy of needs, a motivational theory, not perception. Option C (integration) is not a recognized theory in this context. Option D (third place) refers to social spaces outside home and work, unrelated to perception.
Verified Answer from Official Source:
The correct answer is verified using NCIDQ IDFX content on human behavior and perception.
Exact Extract:TheNCIDQ IDFX Reference Manualstates, “The laws of perception, such as proximity, closure, continuity, and similarity, are part of Gestalt theory, which explains how humans organize visual information.”
The NCIDQ IDFX curriculum includes Gestalt theory as part of understanding human perception, which informs design decisions related to visual organization and aesthetics.
Objectives:
Understand theories of perception in design (IDFX Objective: Human Behavior and the Designed Environment).
What type of drawing communicates the design intent of a project but does not have the level of detail required for final construction documents?
Finish plan
Space plan
Bubble diagram
A bubble diagram is a conceptual drawing used early in the design process to communicate the design intent by showing relationships and adjacencies between spaces in a schematic, abstract form (e.g., circles representing rooms). It lacks the detail required for construction, such as dimensions or specific materials, making it ideal for conveying the overall concept. A finish plan (Option A) is a detailed drawing showing material applications, used in construction documents. A space plan (Option B) is more detailed than a bubble diagram, showing specific layouts and furniture placement, also closer to construction documentation.
Verified Answer from Official Source:
The correct answer is verified using NCIDQ IDFX content on design process and documentation.
Exact Extract:TheNCIDQ IDFX Reference Manualstates, “Bubble diagrams are used to communicate design intent during the programming and schematic design phases, showing spatial relationships without the detail required for construction.”
The NCIDQ IDFX curriculum outlines the design process, with bubble diagrams as a tool for early conceptual design, distinct from detailed construction drawings.
Objectives:
Understand the role of conceptual drawings in the design process (IDFX Objective: Programming and Site Analysis).
The relative efficacy of lamps is measured in which of the following?
Luminous flux (lm)
Lumens per watt (lpW)
Foot-candles (fc) [lux (lx)]
Light reflectance value (LRV)
The relative efficacy of lamps refers to their efficiency in converting electrical energy into visible light, which is measured in lumens per watt (lpW). Lumens measure the total light output, and watts measure the power consumed, so lpW indicates how much light is produced per unit of energy, a key metric for comparing lamp efficiency. Option A (luminous flux, lm) measures total light output but does not account for energy use, so it’s not a measure of efficacy. Option C (foot-candles or lux) measures illuminance (light intensity on a surface), not lamp efficiency. Option D (light reflectance value, LRV) measures how much light a surface reflects, unrelated to lamp efficacy.
Verified Answer from Official Source:
The correct answer is verified using NCIDQ IDFX content on lighting design and technology.
Exact Extract:TheNCIDQ IDFX Reference Manualstates, “The relative efficacy of lamps is measured in lumens per watt (lpW), indicating the efficiency of light output per unit of energy consumed.”
The NCIDQ IDFX curriculum includes lighting principles, emphasizing lumens per watt as the standard measure for lamp efficacy, which is critical for sustainable design and energy efficiency.
Objectives:
Understand lighting metrics and their applications (IDFX Objective: Building Systems and Technology).
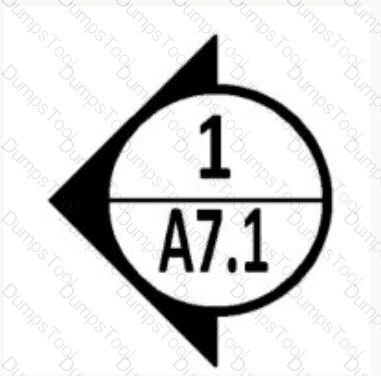
This symbol represents what type of tag?
Plan
Detail
Section
Elevation
The symbol shown in the image is a circular tag with an arrow pointing to the left, divided into two halves. The top half contains the number "1," and the bottom half contains the designation "A7.1." This type of symbol is commonly used in architectural and interior design drawings to reference specific views or drawings within a set of construction documents. To determine what type of tag this symbol represents, we need to analyze its format and context based on standard drafting conventions, as outlined in NCIDQ Interior Design Fundamentals.
Step 1: Analyze the Symbol's Format
Shape and Arrow: The symbol is a circle with an arrow pointing to the left. In architectural drawings, such symbols are typically used to indicate a reference to another drawing or view. The arrow suggests the direction of the view or the location of the referenced element.
Numbering: The top half of the circle contains the number "1," which usually indicates thespecific view or cut being referenced (e.g., the first section or detail). The bottom half contains "A7.1," which likely refers to the sheet number (A7.1) where the referenced drawing can be found.
Context: The symbol is likely placed on a floor plan or another drawing to direct the viewer to a related drawing, such as a section, elevation, or detail.
Step 2: Evaluate Each Option Based on Drafting Standards
Option A: PlanA plan tag typically does not use a circular symbol with an arrow. Floor plans are usually labeled directly on the drawing (e.g., "First Floor Plan") and do not require a reference tag like this. Instead, a plan tag might be a simple label or title block. The symbol in the image is more specific to a cross-reference, not a plan itself, so Option A is not correct.
Option B: DetailA detail tag is used to reference a detailed drawing of a specific element, such as a close-up of a construction joint or a custom millwork piece. Detail tags often use a circular symbol with a number and sheet reference, similar to the one shown. For example, a detail tag might read "1/A7.1," meaning "Detail 1 on Sheet A7.1." However, detail tags typically do not include an arrow indicating direction, as details are not directional views but rather magnified views of a specific area. The presence of the arrow in this symbol suggests a directional view, making Option B less likely.
Option C: SectionA section tag is used to indicate where a vertical cut (section) is taken through a building or space, showing the interior structure or details. Section tags are commonly represented by a circular symbol with an arrow, where the arrow indicates the direction of the view (i.e., the direction the viewer is looking when the section is drawn). The circle is often divided, with the top half showing the section number (e.g., "1") and the bottom half showing the sheet number where the section drawing can be found (e.g., "A7.1"). The symbol in the image matches this format exactly: the arrow points to the left, indicating the direction of the section view, and the "1/A7.1" format aligns with standard section tagging conventions. This makes Option C the most likely answer.
Option D: ElevationAn elevation tag is used to reference an elevation drawing, which shows a vertical view of a wall or facade. Elevation tags may also use a circular symbol with a number and sheet reference, but they typically do not include an arrow, as elevations are not directional in the same way sections are (elevations show a flat view of a wall, not a cut through the building). Some elevation tags might include an arrow to indicate the wall being viewed, but this is less common than with section tags. The symbol in the image, with its prominent arrow, is more characteristic of a section tag than an elevation tag, making Option D less likely.
Step 3: Conclusion Based on Drafting Standards
The symbol’s format—a circle with an arrow, divided into two halves, with a number (1) and a sheet reference (A7.1)—is a standard representation of a section tag in architectural and interior design drawings. The arrow indicates the direction of the section view, and the "1/A7.1" format tells the viewer to look at Section 1 on Sheet A7.1. This aligns with NCIDQ guidelines and standard drafting practices, where section tags are used to reference vertical cuts through a building or space.
While a detail tag might use a similar format, the presence of the arrow strongly suggests a directional view, which is characteristic of a section rather than a detail. An elevation tag is also possible but less likely due to the arrow, and a plan tag does not fit the symbol’s purpose.
Therefore, the correct answer isC: Section.
Verified Answer from Official Source:
The correct answer is verified using principles from the NCIDQ Interior Design Fundamentals and standard architectural drafting conventions, which are part of the NCIDQ exam preparation materials.
Exact Extract:
From the NCIDQ IDFX Reference Manual (a common resource for NCIDQ candidates):
"Section tags are represented by a circular symbol with an arrow indicating the direction of the view. The circle is typically divided, with the top half showing the section number and the bottom half showing the sheet number where the section drawing is located (e.g., '1/A7.1' means Section 1 on Sheet A7.1)."
The NCIDQ guidelines specify that a section tag uses a circular symbol with an arrow to indicate the direction of the section view, with the section number and sheet number provided within the circle. The symbol in the image matches this description: the arrow points to the left, indicating the direction of the section, and the "1/A7.1" format directs the viewer to Section 1 on Sheet A7.1. This is a standard convention in architectural and interior design drawings, ensuring clarity in referencing related drawings. Options A, B, and D do not align with this specific format as closely as Option C does, as they either lack the directional arrow (for plans and details) or are less commonly associated with an arrow (for elevations).
Objectives:
Understand the use of reference tags in architectural and interior design drawings.
Identify the purpose and format of section tags in construction documents.
Differentiate between section, detail, elevation, and plan tags based on their symbols and context.
A designer visits a client and observes employee working relationships as well as how they utilize their work area. What part of the design process is this?
Programming
Space planning
Design development
Construction administration
The design process in interior design consists of several distinct phases, each with specific goals and activities. The NCIDQ IDFX Reference Manual outlines these phases, including programming, space planning, design development, and construction administration, and describes the tasks associated with each.
A. Programming: Programming is the initial phase of the design process where the designer gathers and analyzes information about the client’s needs, goals, and requirements. This includes observing how users interact with the space, such as employee working relationships and how they utilize their work area. These observations help the designer understand the functional and spatial needs of the project, which are then translated into design solutions. The designer’s visit to observe employees is a classic programming activity, as it involves data collection to inform the design.
B. Space planning: Space planning involves creating layouts and arranging spaces based on the information gathered during programming. While observations might inform space planning, the act of observing is part of programming, not space planning itself.
C. Design development: Design development involves refining the design concept, selecting materials, and creating detailed drawings. This phase occurs after programming and space planning, so the observation of employees is not part of this stage.
D. Construction administration: Construction administration occurs during the construction phase, where the designer oversees the implementation of the design, addresses issues, and ensures the project is built as intended. Observing employees in their work area is not part of this phase, as it focuses on construction oversight rather than data collection.
The NCIDQ IDFX Reference Manual specifies that observing users and their interactions with a space is a key activity in the programming phase, as it helps the designer define the project’s requirements.
Verified Answer from Official Source:The correct answer is A, as verified by the NCIDQ IDFX Reference Manual.
Exact Extract:
From the NCIDQ IDFX Reference Manual (Chapter 3: Programming and Space Planning): "Programming includes observing users in their environment, such as employee working relationships and space utilization, to gather data on the project’s functional and spatial needs."
Explanation from Official Source:
The NCIDQ IDFX Reference Manual explains that programming involves collecting data through methods like observation to understand how users interact with their space. Observing employee working relationships and space utilization directly contributes to defining the project’s requirements, making this a programming activity.
Objectives:
Understand the phases of the interior design process.
Identify the role of observation in the programming phase.
To ensure clearances for accessibility, it is BEST to dimension furniture placement to a partition from
Structure
Centerline
Finish face
When dimensioning furniture placement for accessibility, the goal is to ensure clear floor space and circulation paths, as required by ADA standards. Dimensioning to the finish face of a partition (the completed surface, including drywall or other finishes) is best because it provides the actual usablespace available for furniture placement and circulation. This ensures that the designer accounts for the final dimensions of the room after construction, avoiding encroachments into required clear spaces (e.g., 36-inch circulation paths or 60-inch turning radii). Option A (structure) refers to the structural elements (e.g., studs), which do not account for the finished wall thickness. Option B (centerline) is typically used for structural or mechanical layouts, not for furniture placement, as it does not reflect the usable space.
Verified Answer from Official Source:
The correct answer is verified using NCIDQ IDFX content on accessibility and construction documentation.
Exact Extract:TheNCIDQ IDFX Reference Manualstates, “For accessibility, furniture placement should be dimensioned to the finish face of partitions to ensure accurate clearances for circulation and turning spaces.”
The NCIDQ IDFX curriculum emphasizes the importance of dimensioning to finished surfaces to ensure compliance with accessibility standards, as this reflects the actual space available for use.
Objectives:
Apply accessibility standards to furniture placement (IDFX Objective: Codes and Standards).
What is the best way for a designer to convey the locations of flooring transitions between materials?
Provide a detailed finish schedule
Reference the floor covering schedule
Refer to the finish legend and specifications
Include a finish plan in the construction documents
Flooring transitions occur where different flooring materials meet (e.g., tile to carpet, hardwood to vinyl), and their locations must be clearly communicated in construction documents to ensure accurate installation. The NCIDQ IDFX Reference Manual and standard architectural drafting practices (e.g., as outlined by the American Institute of Architects [AIA]) specify the best methodsfor conveying such information.
A. Provide a detailed finish schedule: A finish schedule is a table that lists the finishes for each room or area (e.g., flooring, walls, ceilings) with details like material type and manufacturer. While it specifies what materials are used, it does not show the specific locations of transitions between materials, as it is not a spatial representation.
B. Reference the floor covering schedule: Similar to a finish schedule, a floor covering schedule lists flooring materials but does not provide a visual representation of where transitions occur. It is not the best way to convey spatial information like transition locations.
C. Refer to the finish legend and specifications: A finish legend defines symbols or codes for different finishes, and specifications provide detailed information about the materials. While these tools are useful for understanding what materials are used, they do not show the precise locations of transitions in a spatial context.
D. Include a finish plan in the construction documents: A finish plan is a drawing that overlays the floor plan with annotations or symbols indicating the locations of different finishes, including transitions between materials. It visually shows where one flooring material ends and another begins (e.g., with a line or symbol at the transition), ensuring clarity for contractors during installation. This is the best way to convey the locations of flooring transitions, as it provides a spatial, visual representation that is easy to interpret.
The NCIDQ IDFX Reference Manual emphasizes that a finish plan is the most effective method for communicating the locations of flooring transitions, as it provides a clear, visual guide within the construction documents.
Verified Answer from Official Source:The correct answer is D, as verified by the NCIDQ IDFX Reference Manual.
Exact Extract:
From the NCIDQ IDFX Reference Manual (Chapter 5: Construction Drawings and Specifications): "The best way to convey the locations of flooring transitions between materials is to include a finish plan in the construction documents, which visually indicates where different finishes meet."
Explanation from Official Source:
The NCIDQ IDFX Reference Manual explains that a finish plan is a drawing that shows the spatial distribution of finishes, including the precise locations of transitions between flooring materials. This visual representation ensures that contractors can accurately install the flooring as intended, making it the most effective method compared to schedules, legends, or specifications, which lack spatial context.
Objectives:
Understand the role of different construction documents in conveying design intent.
Identify the best method for communicating flooring transitions in a project.
Which thick-set method would produce the BEST bond for installing tile on an uneven subfloor?
Additional grout
An extra thick layer of adhesive
A mesh substrate with membrane backing
Wire mesh reinforcement of the mortar bed
Installing tile on an uneven subfloor requires a method that ensures a strong bond and a level surface. The thick-set method involves using a mortar bed to create a stable base for the tile. Wire mesh reinforcement of the mortar bed (Option D) is the best method because the wire mesh strengthens the mortar, helping it adhere to the uneven subfloor and providing a durable, levelsurface for the tile. This method is commonly used in commercial and high-traffic areas for its reliability. Option A (additional grout) is incorrect, as grout fills joints between tiles, not the subfloor bond. Option B (extra thick layer of adhesive) can lead to uneven drying and cracking. Option C (mesh substrate with membrane backing) is more for waterproofing or crack isolation, not for leveling an uneven subfloor.
Verified Answer from Official Source:
The correct answer is verified using NCIDQ IDFX content on material installation methods.
Exact Extract:TheNCIDQ IDFX Reference Manualstates, “For uneven subfloors, the thick-set method with wire mesh reinforcement of the mortar bed provides the best bond and stability for tile installation.”
The NCIDQ IDFX curriculum covers installation methods for flooring, emphasizing the thick-set method with wire mesh for uneven surfaces to ensure a strong, lasting bond.
Objectives:
Specify appropriate installation methods for flooring (IDFX Objective: Material Selection and Specification).

TESTED 20 Apr 2025
Copyright © 2014-2025 DumpsTool. All Rights Reserved